How to Apply Ppf Headlight Tint for Maximum Protection?
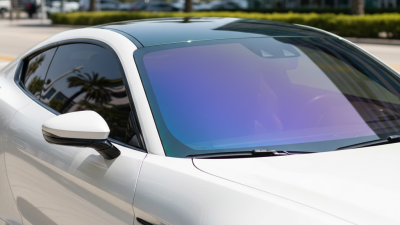
In the automotive industry, protecting vehicle headlights with PPF headlight tint has gained significant attention. Research shows that properly applied tint can reduce UV damage by up to 99%. This not only extends the lifespan of headlights but also enhances their clarity and brightness. According to Michael Legrand, a respected industry expert, “Ppf headlight tint not only shields headlights from debris but also keeps your car looking sharp.”
However, applying PPF headlight tint is not without its challenges. Improper installation may lead to bubbles or peeling, affecting its effectiveness. Users must be careful during the application process, as environmental factors can also play a role. For example, absent-minded installation in humid conditions can result in uneven surfaces.
This highlights a crucial point: while PPF headlight tint is beneficial, it requires skill and precision for maximum protection. In the hands of an inexperienced person, it may unintentionally cause more harm than good. Consequently, understanding the proper methods and precautions is essential for anyone looking to maintain their vehicle's aesthetic and functional integrity.
Understanding PPF Headlight Tint and Its Benefits
PPF headlight tint is a protective film designed to enhance vehicle headlights. This film provides a shield against scratches, debris, and UV damage. Data from industry reports reveal that PPF can reduce the fading of headlights by up to 98% over time. This protection increases safety by maintaining optimal light output.
The application of PPF headlight tint can significantly extend the lifespan of headlights. Experts note that untreated headlights can degrade within three to five years. With PPF, they can remain functional and clear for much longer. Regular maintenance can help preserve the film’s effectiveness, ensuring the protection lasts as intended.
Installation requires precision and care. Misalignment can lead to bubbles or wrinkles. Proper cleaning of the headlight surface is essential before application. Some users report the tint yellowing over time, hinting at potential vulnerabilities. Continuous monitoring is necessary to address any issues early on. This ongoing commitment can maximize the benefits of PPF headlight tint.
Benefits of PPF Headlight Tint
Gathering Necessary Tools and Materials for Application
When applying Ppf headlight tint, gathering the right tools and materials is crucial. Start with high-quality tint film, designed specifically for headlights. A sharp utility knife will help you cut the film accurately. Don’t forget a squeegee to smooth out air bubbles. You may also need a heat gun to help with the application, especially around curves.
One important tip: make sure to clean the headlight surface thoroughly before starting. Use a gentle cleanser to remove dirt or grease. If any residue remains, it can affect the film's adhesion. Another tip is to measure your headlights before cutting the tint. This prevents errors that could waste materials and effort.
Remember, applying the tint can be tricky. If you notice bubbles forming after application, don't panic. You can gently lift the film and use the squeegee to push the air out. This process may require multiple attempts. Practice makes perfect, so don’t be discouraged if the first try isn’t flawless. Each application provides valuable learning experiences.
How to Apply Ppf Headlight Tint for Maximum Protection?
| Tool/Material |
Purpose |
Recommended Quantity |
| Headlight Tint Film |
Provides protection and aesthetic enhancement |
1 roll (enough for both headlights) |
| Heat Gun |
Helps in adhering the tint to the headlight |
1 |
| Squeegee |
Used to remove air bubbles and smooth out the film |
1 |
| Cleaning Solution |
Cleans the headlight surface for better adhesion |
1 bottle |
| Cutting Knife |
For trimming the tint film to the correct size |
1 |
| Masking Tape |
To outline the area where the tint is to be applied |
1 roll |
Step-by-Step Application Process for PPF Headlight Tint
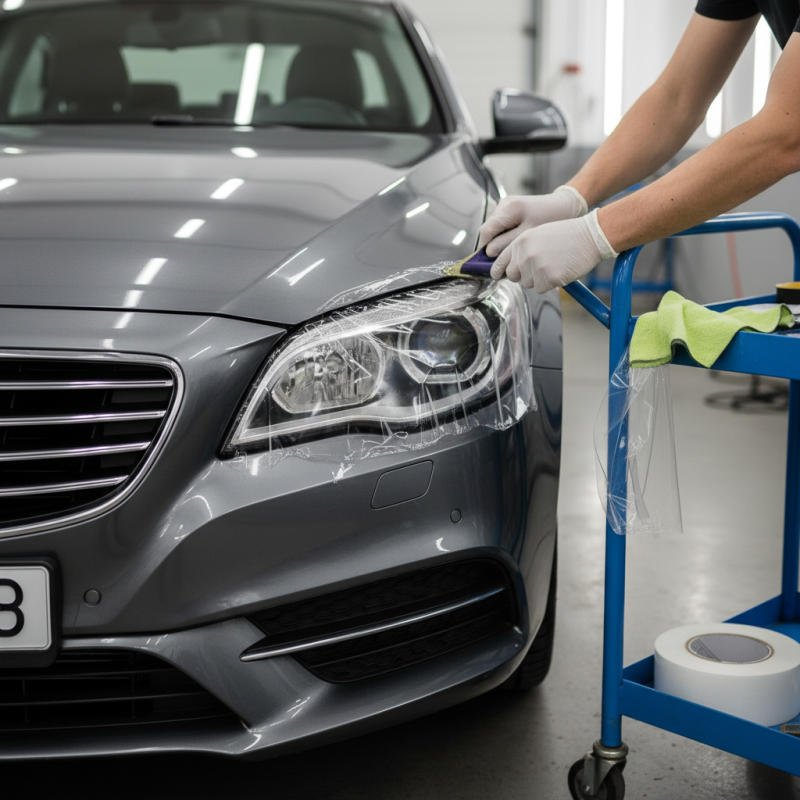
Applying PPF headlight tint can protect your vehicle's headlights from UV damage and road debris. The step-by-step process ensures a flawless installation. Begin by gathering essential tools: a heat gun, application solution, and squeegee. Clean the headlights thoroughly. Dust and grime can lead to bubbling. A study by the Specialty Equipment Market Association highlights that proper surface preparation increases film adhesion by 35%.
Once the surface is clean, cut the film to size. Leave a little extra around the edges for better coverage. Spray the solution on both the headlight and the adhesive side of the film. This allows for easy positioning. Apply the film slowly, ensuring it doesn’t wrinkle. A report from the International Window Film Association indicates that improper installation can reduce the film's lifespan by up to 50%.
Use the squeegee to eliminate air bubbles. Be thorough, as trapped air could cause peeling later on. After installation, use a heat gun to help the film conform to the headlight shape. Reflecting on the process, it’s common for beginners to rush. Patience is key for achieving a uniform finish. Touch-ups may be necessary, especially on curved or uniquely shaped headlights. Attention to detail will ensure maximum protection.
Curing and Maintenance Tips for Long-Lasting Protection
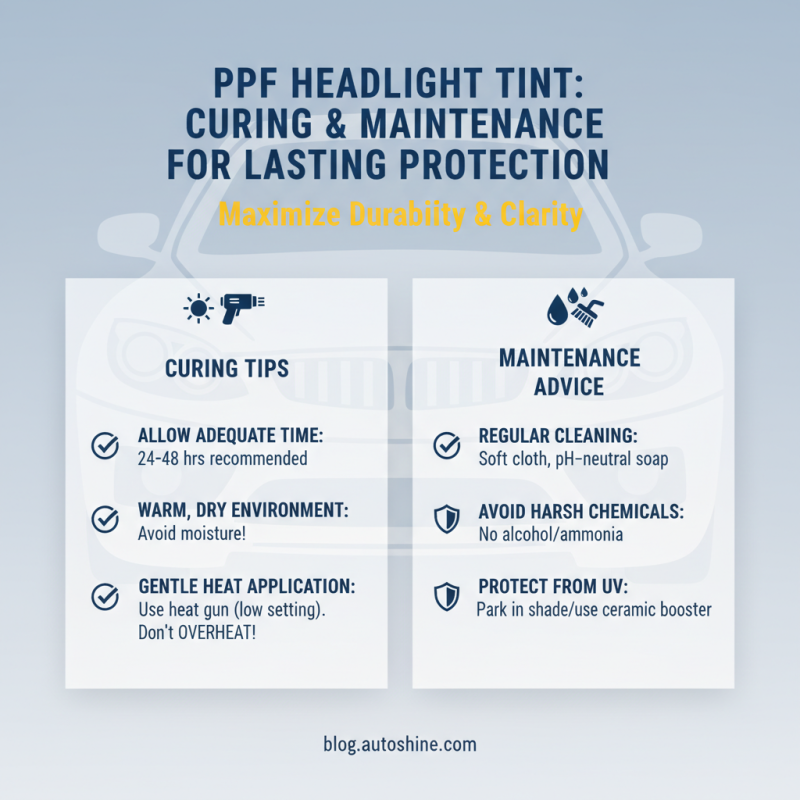
Curing your PPF headlight tint properly is crucial for achieving maximum protection and durability. After application, ensure you allow adequate time for the tint to cure. Ideally, this should be done in a warm, dry environment. Exposure to moisture right after installation can undermine adhesion. Use a heat gun on low to help the curing process if necessary, but be cautious not to overheat the film.
Maintenance is key to ensuring longevity. Clean the surface using a soft cloth and mild soap. Avoid abrasive cleaners, as they can scratch the tint. Regular maintenance will keep the tint looking fresh and vibrant. Consider using a sealant designed for PPF to enhance protection against UV rays and contaminants. It's also wise to regularly inspect the edges for lifting or bubbles. If issues are found, address them promptly to prevent further damage. Remember that these small, consistent efforts will lead to better long-term results, even if they seem tedious.
Common Mistakes to Avoid When Applying Headlight Tint
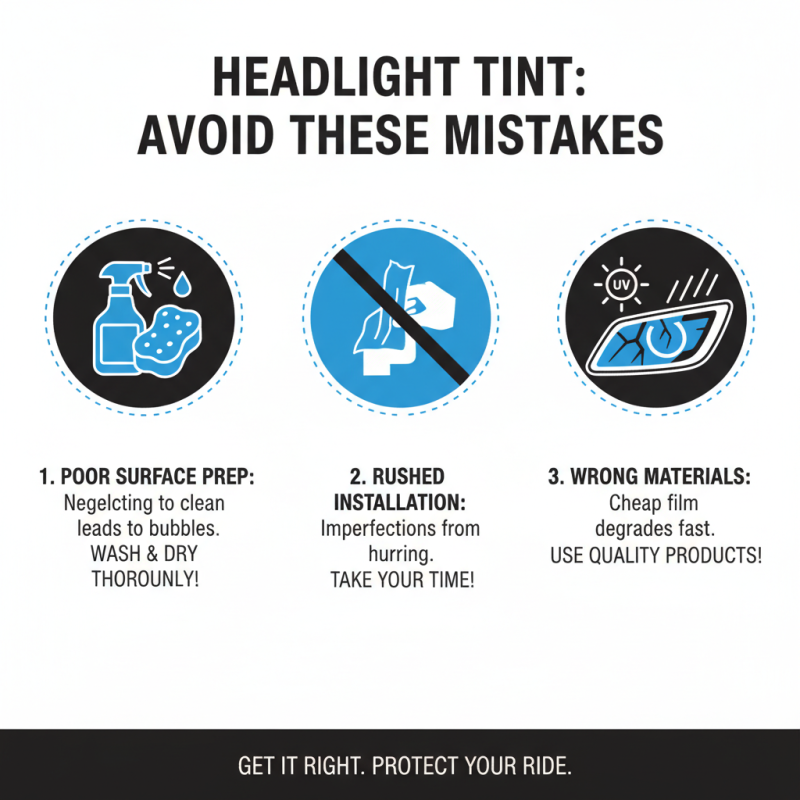
Applying headlight tint can enhance your vehicle's appearance while providing necessary protection. However, there are common mistakes that can lead to unsatisfactory results. One frequent error is neglecting the surface preparation. Without properly cleaning the headlights, dirt and grime can cause bubbles and imperfections under the tint. Take your time to wash and dry the surface thoroughly. Use a suitable cleaner for the best results.
Another mistake is applying the tint in unfavorable weather conditions. High humidity or cold temperatures can affect how the adhesive bonds. Ideally, aim for a dry, warm day to ensure optimal application. Additionally, rushing the installation can lead to misalignments. Patience is essential. Smooth out any bubbles carefully as they appear, rather than ignoring them.
Lastly, many overlook the importance of trimming the edges correctly. A jagged or uneven edge can ruin the aesthetic appeal. Using a sharp utility knife allows for a clean cut, giving your headlights a polished look. Reflect on the process as you go to avoid these pitfalls. Each step counts toward achieving a flawless finish.